Our New Kitchen
I am super excited to finally share with you our finished kitchen! This post has been a long time coming, and this project overall proved to be quite a challenge; However, we could not be more pleased with the finished product! In this post, I am sharing before & afters, the list of all the changes we made, and the sources for each piece of the project. Prepare for picture overload…you have been warned! 😉
The Planning Phase
In early 2018, we began a project to update our living room by adding custom built-ins, new lighting, new furniture, etc. (I’ll write a post to cover all the changes we made there soon). As with most projects, there was a domino effect! Because our kitchen and living room are essentially one big open space, I knew once the living room was completed that I wanted to tackle the kitchen next. I knew it would be a big project, and I wanted to be very thoughtful about the decisions I made, so I started planning and gathering inspiration over a year ago! The goals were for the kitchen to be fresh and bright, and more cohesive with the living space, dining room and foyer. While we live in a farmhouse, I wanted a more timeless space with farmhouse elements sprinkled in, hence a little shiplap and wood accents, without going too trendy. I browsed Pinterest and Instagram, saving tons and tons of pictures and ideas. I would go back through my inspiration photos and take note of where I noticed commonalities, as those were the things to which I was naturally drawn. I definitely saved some things that I later decided were too trendy, so I am glad that I took time to really think through the plans. I also created a “mood board” of sorts to get a visual idea of how the things I thought I wanted to do would actually look together. (Tip: you can easily do this through apps like Canva, or you could just create a blank slide in PowerPoint. I would screen shot the pictures I liked, save them, then import them and add them to the collage). Keep in mind I am not an interior designer – for that reason, I was hesitant to share my mood/inspiration board because it is not the cleanest or prettiest, but I thought it may be helpful to show you what I was working with.

Once I decided the direction I wanted to go with everything, I began gathering estimates so I could get an idea of how much each component would cost before actually beginning the work, that way there would not be any surprises. Like with any big project, of course there are surprises and additions along the way, so the final cost ended up being more than we thought. Just be prepared going in!
The Execution Phase
Now here is where it got challenging. I did not work with a general contractor or designer for the project – I did all of the planning and coordination myself. It got overwhelming quick, so I ended up listing out each and every task that needed to be completed in an Excel spreadsheet, along with associated dates and the person responsible so that I could keep track of everything and manage the timeline. So many components were dependent on others finishing their tasks, so the timeline slipped a few times, and we definitely hit a few snags along the way. All in, I would say it took two months for everything to be completed, but we were only out of commission in the kitchen for the first month.
Here is a list of the changes we made:
- Replaced existing island with a new, custom island that was a bit larger
- Replaced countertops
- Replaced tile backsplash
- Removed the microwave from over the range and added a custom hood
- Replaced sink, faucet and all cabinet hardware
- Painted the cabinets, walls and trim (as well as in the living room)
- Replaced all lighting and added new under cabinet lighting (we previously had puck lights – now we have bar lights that are hardwired and they are SO bright! One of our favorite things about the new kitchen)
- Created a spice cabinet in the new island
- Created a pull out trash bin in the existing cabinets
- Replaced all appliances
- New furniture and rug for the kitchen nook and new barstools (this actually happened late last year and I covered the original plans in this blog post)
- Removed the plantation shutters from the windows and added window treatments
- Added floating wood shelves
- Replaced the original white columns between the living room and kitchen – they were round, traditional columns…we replaced them with wood columns (this was done late last year)
- Removed the chair rail from the kitchen walls
The Finished Product
Now for the fun part…here are the before & after photos! There are a lot…but I wanted you to be able to see all the details! I have included sources throughout but I also listed them at the end of this post.


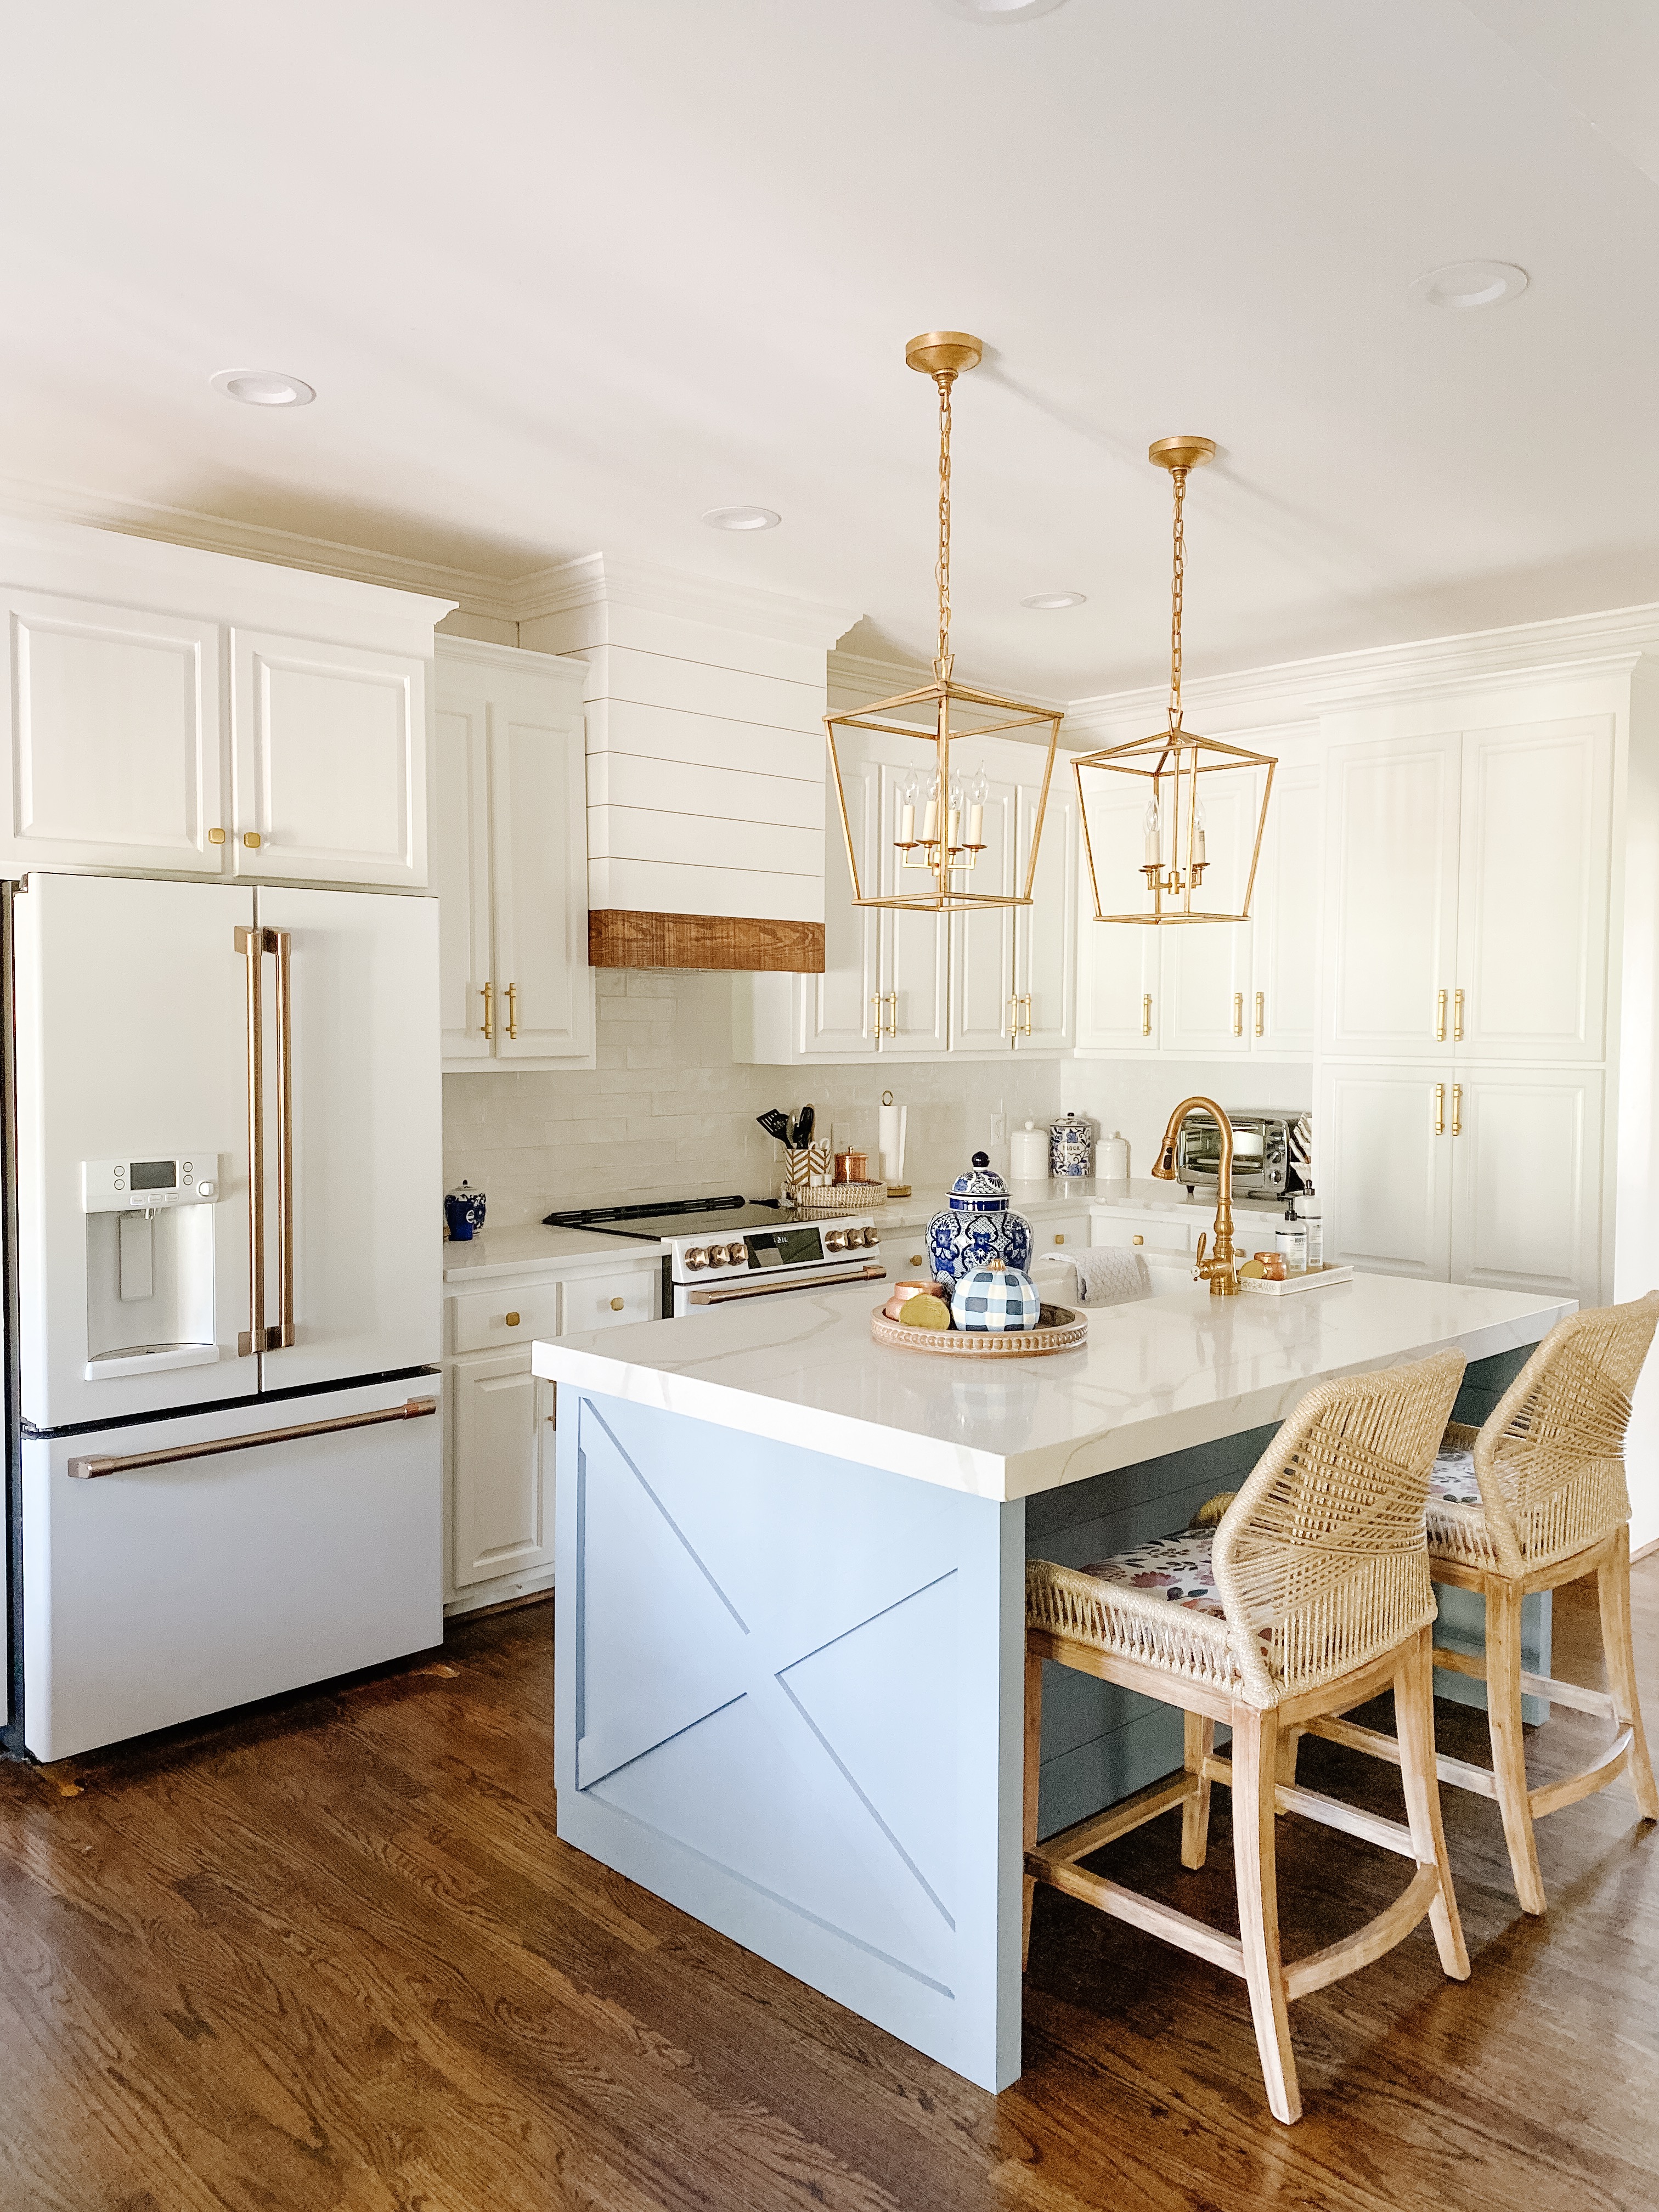
The craftsman that we commissioned to do our woodwork (Daniel Peoples with Tyson Creek Studio in Greenville, NC) is the same person who has done prior projects – he is amazing and his work is always spot on with what is in my head! For the island, he added a little shiplap detail to the front side where the counter stools slide in, and then he added the “X” detail to the end which coordinates with the side of the built-ins in the living room (also built by him).


After tons of research on countertops, we ended up replacing our existing granite with quartz. I wanted a top that was less busy than what we had, and this one ended up being perfect. It is white and has nice thick grey veins throughout for a bit of movement. I LOVE them. Best thing is that they are super durable (moreso than granite), they won’t stain, and they’re easy to clean. For the island, we went with a 2.5″ “mitered edge” which gives the illusion of a super thick slab, but it is really only the edge that is thick. I love the statement that it makes!
For the tile backsplash, we went with a “handmade” subway tile in a 3″x12″. The “handmade” aspect makes it have that textured, uneven look. Super pleased with how it turned out.


Daniel also built the custom hood that also has the shiplap detail with a wood beam at the bottom. I really like how the wood pops against all the white. We took down the microwave and bought a smaller one and placed it in a large cabinet above our pantry. It has worked out perfectly.


I always loved the oil rubbed bronze pendants that we previously had, but I knew I wanted to go with something brass, and I also wanted them to be totally open with no glass. I ended up going with two of these pendants in the small size.


I ended up going with brushed brass finishes (faucet, cabinet hardware, appliances hardware). I will admit, I was super nervous about whether or not they would all match. In the end, not every finish is an exact match, but they blend perfectly.


Now onto the breakfast table area…


Copper Tea Kettle (another option) | Cheese Board | Blue & White jar


Sources:
- Custom Island & Hood – Tyson Creek Studio (Daniel Peoples)
- Counters – Quartz Statuary Stratus – slabs from Daltile (Raleigh location) and fabricated/installed by GraniTops
- Tile – “handmade” 3″x12″ subway; purchased locally from Carolina Tile
- Island Paint Color – Sherwin Williams “Notable Hue” in semi-gloss
- Cabinets & Trim – Sherwin Williams “Pure White” in semi-gloss (FYI, the cabinets were sprayed)
- Walls – also Sherwin Williams “Pure White” but in eggshell
- Island Pendants
- Chandelier over the table – similar option
- Rug under the kitchen table
- Rug in front of the sink
- Dining Chairs
- Counter Stools – also here
- Fabric used to recover counter stools (1 yard covered both)
- Window Treatments Fabric
- Kitchen Table – custom by Tyson Creek Studio (Daniel Peoples) – similar one here
- Floating Shelves – custom by Tyson Creek Studio/Daniel Peoples but you can find similar ones here
- Appliances – GE Cafe
- Faucet – purchased locally from Wilkinson Kitchen & Bath
- Cabinet Hardware – Belwith Keeler “Monroe” in brushed brass purchased locally from Wilkinson Kitchen & Bath

While it was a challenge, it was awesome seeing my vision come to fruition. Being in the new kitchen makes me so happy and I honestly would not change a thing!
I told you this was going to be a long post, so if you’re still here, thank you so much for sticking around and reading! Please don’t hesitate to let me know if you have any questions that I didn’t already cover here…happy to help! Have a great day!


Comments (7)
Janice
October 15, 2019 at 9:30 pm
Love your new kitchen!
2 quick questions…1. Why did you decide to remove the chair rail in the kitchen? 2. Did you remove it from the living room also? I have been debating on removing our dental molding.
Shannon Aycock
October 15, 2019 at 9:41 pm
Thank you Janice! It was actually only in a few places in the kitchen and was not carried through into the living room. To me, it always looked like it was afterthought that the builder just added…I never liked the way it looked!
Carrie Eastman
October 16, 2019 at 8:41 am
Great Job! You hit a home run with your remodel!
Shannon Aycock
October 16, 2019 at 8:49 pm
Thank you so much!!
Leslie
October 16, 2019 at 12:51 pm
This is sooooo gorgeous ❤️
Shannon Aycock
October 16, 2019 at 8:49 pm
Thank you sweet friend!!
Kendall
October 19, 2019 at 10:14 am
Everything is so beautiful and thoughtfully done. You always give me such inspiration.
Comments are closed.