Laundry Room Makeover + How I Painted Our Tile Floor
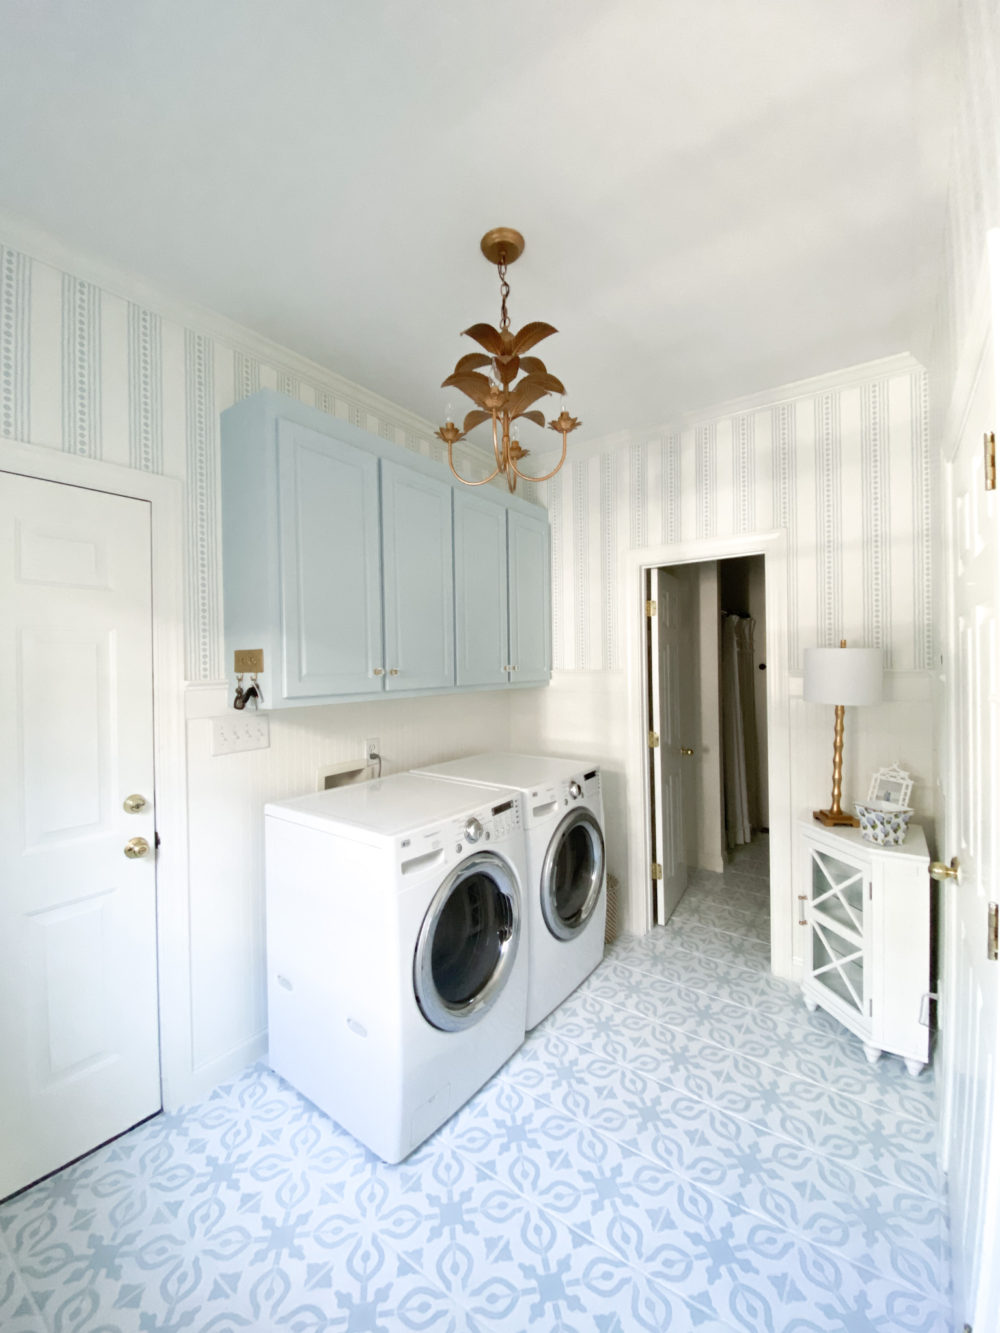
While being stuck at home throughout 2020, I decided to tackle several house projects (along with a lot of you, I’m sure!), and one of the biggest ones was our back entry and laundry area. We made several updates as you’ll see in the photos, but it all started with the floor. We have travertine tile in that area and it had become quite an eye sore over the years. It was very dated and in desperate need of an upgrade. I figured we would eventually replace it, but then I came across posts on Pinterest and Instagram showing where folks had painted and stenciled their tile floors and I was immediately intrigued. I decided that I was going to try to do this to our laundry area, and even bought a stencil pattern…then I chickened out and didn’t do it…this was almost two years ago. Fast forward to 2020 and being stuck at home basically 24/7, I decided the time was right, mustered up my courage and went all in. I’ve shared all the details on the process as well as the products I used further below, but first let me show the before and afters of the entire space!
In addition to painting the floor, I also painted all of the trim and cabinets (I used this paint sprayer to paint the cabinets – one of the best purchases ever!), then we had the wallpaper installed professionally. I seriously LOVE how it all turned out, but the transformation of the floor is the real showstopper!


Sources:
- Trim Paint: Sherwin Williams White Dove (color matched to Benjamin Moore’s White Dove)
- Cabinet Paint: Sherwin Williams Sleepy Blue
- Click here for cabinet hardware
- Wallpaper: Thibaut (pattern is New Haven Stripe in Spa Blue)
- Window Treatment Fabric: Thibaut (pattern is Tiverton in Spa Blue)
- Click here for light fixtures
- Click here for corner cabinet
- Click here for hallway runner
Details on the Painted Tile Floor

So let’s talk about the nitty gritty details on how I tackled painting this floor. Before I got started, I read SEVERAL blog posts that I found on Pinterest and I compared others’ techniques, the products they used, etc. to decide the best approach. There are too many posts/tutorials to link here, but just search “painted tile floor” on Pinterest and you’ll find plenty. I also went into this knowing that it may be a disaster or that it may not hold up well long-term, and I was fine with that. We would have ultimately replaced the floor anyway, so I figured if I can get at least a year out of the finished product, I will be satisfied. I am happy to report that almost five months in, the floor has held up really well! There are a couple of tiny spots that were chipped early on, but you wouldn’t be able to easily spot them. Also, I did not move the washer and dryer so that I could paint underneath. If you’re incredibly OCD, the fact that the floor isn’t painted under the washer/dryer may drive you crazy, but it honestly has not bothered me one bit, and you can’t tell by just looking at it, as I did get as far underneath as I could with the paintbrush.
Step 1 – Prep/Priming
I started with thoroughly cleaning the floor and taping everything off. Some tutorials recommended lightly sanding the floor first, but I opted to skip the sanding. If you have a super slick surface and are concerned about the paint adhering well, then I would definitely take the time to sand it first. I used this Zinsser Primer (a quart was sufficient) to prime the floor and I applied a total of two coats. Make sure the floor is totally dry to the touch before applying the second coat. I started the process at night after work, so I applied the first coat that night and then the second coat early the next morning. The primer appears to go on pretty thin and did not cover very well, but don’t worry – by the time you apply the second coat of the base paint, you should have good coverage. I used this 6.5″ roller with a 3/8″ nap to apply the primer as well as the base coat, and then I used this 2″ regular, angled paint brush to paint the grout and around the baseboard. Below are images of each.

The brush I used to apply the primer and base coat to the tile:

The brush I used for the grout and around the baseboard:

Step 2 – Base Paint
I spent a lot of time trying to figure out the best paint to use. I had seen where others’ had just used regular wall paint, and I almost went that route but decided against it. I came across someone who shared they had used the Valspar Porch Floor & Patio paint from Lowe’s, so I went to my local store and talked to one of the paint specialists in person and they also recommended it. I got one gallon of the standard white and applied two coats (my space was a bit big as it consisted of the back entry/laundry area and a bathroom, and one gallon was plenty for the job). I applied the first coat of base paint on Friday night and then did the second coat on Saturday morning. After the second coat of the floor paint, I was super excited – it looked SO much better at this point! I used the same brushes that I used for the primer to apply this.

Step 3 – Stencil
By far the most tedious and time consuming part of the project was the stenciling. I started on a Saturday afternoon and finished it on Sunday. This is the exact stencil pattern I chose, and I ordered two just in case (I am glad I did because I ended up using them both). Our tile size is 12″x12″ so that is the stencil size that I ordered, and I ended up needing to cut the stencil for the smaller tiles that had been cut/trimmed (such as the area around the toilet, beside the baseboard, etc.). I also had to “free hand” the pattern in some spots because it was too difficult to maneuver the stencil, and that was hilarious (an artist or painter I am NOT)! Luckily you can’t see all those imperfections unless you look really hard for them. I used the same Valspar Porch & Floor paint to do the stenciling, too. I got the quart size and was able to get it customized in the blue shade I wanted, which was Sherwin Williams Sleepy Blue. As far as application, I alternated between using a 4″ foam roller as well as a 1″ stencil brush. I started out just using the stencil brush, but it was a lot slower, so I preferred the roller, then I would touch up any “thin” spots with the brush. When it comes to the roller, LESS PAINT IS KEY…I would dip the roller in the paint, and then roll a good bit of it off onto the paint tray before painting the stencil. If you have too much paint, then it will become messy and bleed through the stencil and it is difficult to correct. I stenciled all of the full sized tiles first, and I alternated between tiles – so I painted every other one – then after the first few dried, I went back and did the ones that were in between. This helped prevent the stencil from touching a wet tile and causing a mess with the paint. I painted the smaller tiles last since that required me cutting the stencil pattern to fit. There are videos of all of this saved to the “Painted Tile” story highlight on my Instagram, so definitely refer to that to get a visual of what I’m talking about! Honestly, you’ll get in a groove as you go – don’t overthink it too much!
The stencil pattern I used:

The floor paint I used for both the base coat and the stenciling:

The foam roller I used for the stenciling:

The stencil brush I also used for the stenciling:

Step 4 – Top Coat
Ahhhh, the top coat…we’re in the short rows now! After the stencil paint was completely dry, I began the last step which was applying the top coat/sealant (you’ll also want to make sure you wipe over the floor and get up any and all dust, hair, etc. before you begin). I used Polycrylic Protective Finish in Semi-Gloss and a quart did the job. I followed the instructions on the can and ended up doing THREE coats (if you’re doing the math, I ended up going over the floor a total of EIGHT times start to finish…makes me tired just thinking about it!). I waited the instructed amount of time in between coats, and I used a regular paint brush that I already had to apply it. After I finished the poly, we let it dry and cure as best we could by avoiding walking on the floor for three days. I finished on a Sunday night and I think we waited until Thursday before walking on it.

As far as time invested in this project, I worked on it from Thursday through Sunday (a couple of hours on Thursday night, a couple of hours on Friday, and pretty much all day Saturday and all day Sunday). All in expense was probably in the ballpark of $150.
This project is NOT for the faint-hearted. As much as I LOVE how it turned out, it was by far the absolute hardest project I’ve ever taken on, and I do not plan to ever paint a tile floor again! Don’t let those folks on Pinterest and Instagram fool you into thinking this is “easy” because it isn’t, at least it wasn’t to me! Even though it was hard AF (not to mention how freaking sore my legs were afterward!), it was totally worth it – I am very glad I did it and pretty darn proud of myself for how well it turned out!
Closing this post out with a cute photo of my favorite (and nosey) partner in crime, Oliver! Hope you found this post helpful, and good luck if you decide to tackle painting your own tile floor!